Monday 23 May 2011

What led to the Gallipoli campaign?

Even as late as August 1914 it was unsure whether or not the Ottoman empire (now Turkey) would come into the first world war. The country was in no condition to join the war. The Ottoman Empire was largely disintegrated: Bulgaria was now independent, Salonika, Crete and the Aegean islands had gone to Greece, Italy had seized Tripoli and the Dodecanese, and Britain had partlial control over Egypt and  Cyprus.
It came down to a choice between Britain and Germany. At this time, Germany was the logical choice as they were eager for the position, geographically, and were willing to improve the Turkish army . But the problem was that Germany was hated at this time by the turkish and according to Lewis Einstien, the Special Minister of the American Embassy in Turkey, the Turkish preferred the English to all other foreigners. England was a wealthy empire, she had command of the sea thanks to her advanced navy and she had France and Russia on her side who were both wealthy countries. The presence of Russia in the alliance, however, was an obvious set back in the decision since Russia was a traditional enemy of the Ottoman Empire. Still, the Turks proposed an Anglo-Turkish alliance. However, the proposal was refused by the British. And so, by August 1914, things had drifted into the Germans favour.
On August 2, a secret alliance was formed between the Ottoman Empire and Germany. This alliance was directed against Russia.
German officers, technicians and instructors began to appear in Constinople. They took control of the munition factories in the capital , they manned the guns along the Bosphorus and Dardenelles, and they reorganised the Turkish infantry. On October 30 the Russian, British and French Ambassadors in Constantinople delivered a twelve hour ultimatum to the Turkish Government. When it went unanswered they left the country and hostilities began the next day. The Ottoman Empire was now in the war as an allie of the Germans.
The British forces needed to find a way to break the German lines. The British empire thought that their superior naval rescources would be the answer to this problem. Winston Churchill, who was the First Lord of the Admiralty, suggested several strategies that used Britians superior sea power. One of these strategies was an assault on the Dardanelles. The Dardanelles is a fifty kilometre long narrow strait  that seperates the Aegean sea and the sea of Marama. It Is 50 Kilometres long and is less than 2 kilometres wide at the narrowest point. This section of the Dardanelles is called the Narrows. The aim was to send a fleet of warships through the strait into the Sea of Marama and threaten Constantinople (now Istanbul), which was the capital of the Ottoman Empire. The city guarded the Bosphorus sea, which is a narrow waterway that leads to the black sea.The city resided on the shores of the sea of Marama so it was open to attack from the ocean.
Winston Churchill quickly ordered the bombardment of the forts guarding the Narrows. This operation formally declared war on the Ottoman Empire. This made the Turks realize the threat that the British Empire imposed and quickly improved their defences around the Dardenelles which included laying mine fields and constructing forts that consealed large artilary weapons.
A British and French fleet that included 18 battleships, attempted to force its way through to Constantinople by taking on the forts at long range. Three capital ships were lost and three crippled. The naval commanders came to the conclusion that they could not force their way through the Dardanelles unless troops were first sent to occupy the Gallipoli Peninsula and destroy the Turkish guns guarding the Dardanelles. Planning for the landing of troops on Gallipoli commenced
As early as November 1914, Winston Churchill had suggested an attack on Gallipoli but his fellow members on the War Council said that Churchill's plan was too risky and so they rejected it. The stalemate went on and the actions the council needed rethink their position.
The Turks were advancing northward in the Caucasus, heading for Russia. The Russians called for assistance but the Russian forces soon drove the turks back. These events changed the minds of the War Council and so the War Council approved proposal on January 15 1915. 
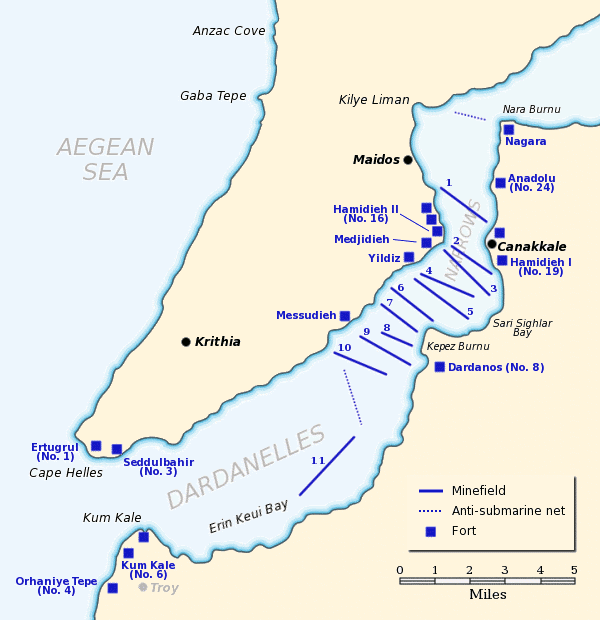
This map shows the Turkish defences that the Allies would have to pass to get to Constinople.(This map is found at http://en.wikipedia.org/wiki/File:Dardanelles_defences_1915.png )


What happened during the Gallipoli Campaign?


1915
 Significant Events During the Gallipoli Campaign 
Jan 18
In Egypt, the NZ Infantry Brigade, NZ Mounted Rifles and NZ Artillery Brigade join with the 1st Australian Light Horse Brigade and the 4th Australian Infantry Brigade to form the New Zealand and Australian Division under the command of Major General Sir Alexander Godley (GOC of the NZ Expeditionary Force).
25
NZ Infantry Brigade ordered to Suez Canal
26
Infantry Brigade leave Zeitoun for Ismailia and Kubri
Feb 1
Advance parties 4th Aust Inf Bde arrive at Zeitoun
3
Turkish troops attack Suez Canal. New Zealanders engage; one man dies of wounds and another is wounded
19
Naval attack on the forts at the entrance of the Dardanelles
26
NZ Infantry Brigade returns from Suez Canal to Zeitoun
Mar 18
End of Dardanelles Naval attack. QueenIrresistible and Bouvet sunk.
29
Inspection of Division by Sir Ian Hamilton
Apr 9
NZ and A Division, less mounted units, entrain for Alexandria
10
First transports leaves for Mudros
15
Transport Lutzow with Divisional Headquarters on board arrives in Mudros Harbour
24
French, British, Australian and New Zealand transports leave Mudros Harbour
25
French land at Kum Kale

British land at Cape Helles

Australian and New Zealand Army Corps (ANZAC) land at Anzac Cove; 3rd Australian Infantry Brigade force a landing at dawn

NZ Divisional Headquarters and details ashore at 10am; Auckland Battalion all ashore by 12 noon; No 1 Field Company NZ Engineers and Canterbury and Otago Infantry land during the afternoon

Wellington Infantry land during the night
26
6am two guns of NZ Howitzer Battery land and come into action

Turkish counter attacks beaten off at Anzac
27
2nd Battery NZFA lands at 3am

Heavy attack against centre and Walkers Ridge beaten off 9.30am
28
Portsmouth and Chatham Battalions (Royal Marine Brigade) arrive 6pm

No 2 Company Divisional Train arrive at night
29
Heavy Turkish attacks all along the Anzac line

A Naval Brigade (Nelson and Deal Battalion) arrive at night
May 2
Turkish observation post destroyed at Lala Baba by Canterbury Battalion
2/3
Otago attack on at head of Monash Gully (Baby 700) fails
3
Turkish warship in straits fires on transports;Annaberg hit
4
Australian raid on Gaba Tepe beaten off
5/6
NZ Infantry Brigade and 2nd Australian Brigade leave for Cape Helles
6
3rd Reinforcements arrive at Anzac (839 men) - sent down to Helles

Combined French, British and Colonial Forces commence attack on Krithia
7
New Zealanders in support of 29th Division
8
NZ Infantry and 2nd Australian Brigade attack on Krithia defeated
10
Australians at head of Monash Gully attack Turks, but withdrew
12
NZ Mounted Rifles (1,500 men) arrive at Anzac to fight as infantry

General Chauvel with 1,400 men of the Australian Light Horse arrives at Anzac
14
HMS Goliath sunk at mouth of straits

Queenslanders make a sortie from Quinns Post
15
General Birdwood slightly wounded in the head at Quinns Post

General Bridges mortally wounded
16
6-inch Howitzer with RMLI crew arrives in support of the Division

Machine Gun detachment Otago Mounted Rifles arrives at Anzac
17
2nd Australian Infantry Brigade returns.

3 guns of 2nd Battery NZFA manhandled up to Plugges Plateau
18
Heavy Turkish attacks

German Taube flew over Anzac
19
Turkish attack at Anzac defeated

NZ Infantry Brigade returns from Helles
20
Otago Mounted Rifles (500) arrive at Anzac to fight as infantry

Turks first ask for an armistice
24
Armistice Day to bury dead
25
HMS Triumph torpedoed off Gaba Tepe
27
HMS Majestic torpedoed off Cape Helles
28
Late at night Turks fire mine in front of Quinns Post

Canterbury Mounted Rifles take "Old No 3 Post"
29
Attack on Quinns Post - Major Quinn killed

NZ Infantry Brigade relieves 4th Australian Brigade No 3 Section
31
Turk blockhouse blown up in front of Quinns by two sappers

NZ Mounted Rifles forced to abandon Old No 3 Post
Jun 3
2nd Field Company NZ Engineers (239) arrive at Anzac
4
Slight advance made at Cape Helles

Canterbury Infantry raided from Quinns Post late at night
5
Sortie against German Officers Trench opposite Courtney's Post
7
Fourth Reinforcements arrive at Anzac (1,761)

Sortie from Quinns Post night of 7/8th
8
First Monitor appears off Anzac
10
Scouting parties of NZ Mounted Rifles driven back to No 2 Post
12
4.5 Howitzer taken from Howitzer Gully up to Plugges Plateau
21
French capture the Haricot Redoubt at Cape Helles
28
Successful British attack at Helles
29/30
The last Turkish attack at Anzac fails
Jul 2
Determined Turkish attack at Helles unsuccessful
4/5
Another heavy attack beaten off by British at Cape Helles
10
Turks at Cape Helles ask for Armistice to bury their dead - refused.
12
General Masnou, commanding the 1st French Division at Helles, mortally wounded
31
200 men of the 11th West Australian Battalion take Turkish trenches opposite Tasmania Post
Aug 3
13th (New Army) commences landing at Anzac
6/7
British attack at Cape Helles

Australians attack at Lone Pine, Quinns Post and Russells Top

Old No 3 Post retaken and Table Top and Beauchops Hill taken by NZ Mounted Rifles

Damakjelik Bair captured by Left Covering Force (Traver's 40th)
7
9 Corps land at Suvla Bay before dawn

Rhododendron Spur in the hands of New Zealanders

Auckland Battalion attack fails
8
Wellington Battalion captures Chunuk Bair

Reinforced by Auckland Mounted Rifles during day

Relieved by Otago Battalion and Wellington Mounted Rifles that night

New Army remains inactive at Suvla

Fifth Reinforcements reach Anzac and go into the firing line
9
Ghurkas reach the Saddle between Hill Q and Chunuk Bair

New Zealanders hold Chunuk Bair; relieved at night by New Army Troops
10
New Army Troops driven from Chunuk Bair by Turkish counter attack
11
Stalemate at Suvla
21
First attack on Hill 60
26
Maheno arrives off Anzac
27
Battle renewed for the possession of Hill 60
28
New Zealanders hold and consolidate position on Hill 60
Sept
Troops withdrawn to rest at Sarpi on Lemnos
29
British and Indian troops enter Kut-el-Amara
30
10th (Irish) Division leave Sulva for Salonika
Oct 3
2nd French Division leave Helles for Salonika
11
Lord Kitchener asks Sir Ian Hamilton for the estimated cost of evacuation
12
Sir Ian Hamilton replies that evacuation is unthinkable
14
In the House of Lords, Lord Milner and Lord Ribblesdale call for the evacuation of Gallipoli
16
Lord Kitchener recalls Sir Ian Hamilton
17
Sir Ian Hamilton issues his farewell order
20
General Munro, in London, received instructions to proceed to the Near East to take over command of the Mediterranean Expeditionary Force
23
Wreck of Marquette carrying 1st NZ Stationary Hospital to Salonika - 10 NZ nurses drown
30
General Sir Charles Munro first visit to the Peninsula
Nov 2
4th Australian Infantry Brigade arrives from Sarpi Rest Camp
10
NZ Mounted Rifles return to Anzac from Mudros Rest Camp
13
Lord Kitchener visits Anzac

Mr Winston Churchill resigns from the British Cabinet
17
Lt Col Braithwaite, DSO, assumes command of NZ Infantry Brigade
24
Period of silence ordered: lasted 72 hours

Major General Russell assumes command of NZ and A Division
26
Major General Godley assumes command of Army Corps
27/28
Commencement of the Great Blizzard
Dec 3
General Townshend besieged at Kut-el-Amara
8
General Munro orders General Birdwood to proceed with the evacuation of Anzac and Suvla
10/11
All sick, wounded, surplus troops, vehicles and valuable stores removed
12
Announced at Anzac that a winter rest camp would be formed at Imbros. Surplus guns removed
15
Detailed orders issued for the evacuation
16
All ranks warned of impending operation
19
The last night of the evacuation of Anzac and Suvla
20
Evacuation of Anzac and Suvla completed by daylight

Troops disembarked at Lemos
25
Christmas Day mostly spent at sea on transports returning to Egypt. Troops transferred to Egypt between December 21 and 31
1916
Jan 9
Evacuation from Cape Helles completed


                               Day By Day at Gallipoli(Found athttp://www.rsa.org.nz/remem/anzac_gallipoli.html)


Naval Attacks

The British and French naval attack on the forts guarding the narrows began on 19 of January, 1915. Within a week the forts guarding the outer reaches of the Narrows and the Dardanelles were destroyed and attention was turned to the defences of mine fields guarded by batteries of mobile field guns and howitzers.
The allies progress was slow.This was because of an attempt to destroy the forts and guns guarding the defences that was made on March 18, 1915. It ended in disaster. Some ships struck mines, three of which were lost. This meant that the turkish mines remained a barrier for the allied forces.
The Proposal of Landing

Even before the naval attack started, the war council had decided to support the attack with a landed force. General Sir Ian Hamilton who was put in charge of of the Mediterranean Expeditionary Force, decided to visit the area to check on progress but by the time he arrived in the region on March 17, there were doubts about the naval strategy. The events that followed, on the 18th of March, confirmed these doubts and Hamilton soon shifted emphasis to a military operation.
A landing was proposed. The aim would be to capture the Kilid Bahr Plateau. From there the rest of the Turkish positions could be destroyed and the naval assault could continue.
  
The Landing

Military forces commanded by Sir Ian Hamilton gathered in Egypt. There were 75,000 men who were in the Mediterranean Expeditionary Force.  These men came from France, the United Kingdom and other parts of the British Empire. The Anzac's were among these and they had been in Egypt since December, 1914, training for the Western Front. Though the Anzac's would now be landing at Gallipoli.
On April 25, 1915, New Zealand and Australian troops landed at Anzac Cove on the Gallipoli Peninsula. The troops had to fight their way up steep cliffs in order to establish a foot hold. The Turkish army dug in on the higher slopes and bombarded the Anzac's with rifle and  mortar shell fire. Many were killed or wounded as they came ashore.
Those who survived rushed forward, attacking the Turks with rifles and bayonets. They succeeded in driving them back, establishing a beach head and digging in on the slopes. This is where the New Zealand and Australian forces first got the name 'diggers'. Gradually the a front line was formed and some order was achieved. Lieutenant Colonel Malone described the situation: 
'The hillside is studded with dugouts, and like an ant heap, swarming with men, the foreshore piled up with stores and ammunition like some huge railway siding.'
The battle settled into a stalemate. Neither the Anzac's or the Turks could make any progress. The Anzac's could not make any progress up the slopes because of Turkish grenades, artillery, rifle and machine gun fire.The Turkish army could not drive the Anzac's back into the sea because of their unyielding ability to hold their ground. Though neither side could make headway casualties were high on both sides.
This map shows the landing sites that the Allies used to land at Gallipoli.(This map was found at http://www.nzhistory.net.nz/media/photo/gallipoli-landings-map )

Battles at Gallipoli

Short battles that were often costly to both side were common during the first few months of the campaign. Both the Ottoman Empire and the Allied Forces needed to call in reinforcements with in two days of the start of the Gallipoli Campaign. One of the early battles was was the Anzac's attack on the Baby 700.This attack was planned after the arrival of four Royal Naval Division Battalions. The baby 700 was a hill 180metres above sea level and it would serve as a look out for the Anzac's to use. The plan was too ambitious, poorly planned and uncoordinated. Eventually Anzac troops retreated because of this and received around 1,000 casualties.
At Cape Helles, the British forces tried to take the village of Krithia on the 6 of May, 1915. It was a dangerous plan to begin with as it consisted of a frontal attack in broad daylight. The Wellington Battalion was to rush in after an artillery bombardment. Unfortunately, the artillery attack was weak and the Wellington battalion struggled to make even a few hundred metres before having to settling back into a stale mate. This second attack on Krithia helped the British forces make a gain of 500 metres inland though it was at the cost of 6,500 British casualties, including 800 New Zealanders.
After the failures at Helles, more attention was given to the troops at Anzac Cove. There the Anzac's had become better organised and reinforcements had arrived which had brought with them the New Zealand Mounted Rifle Brigade. On the 19 of May, 1915 the Turks launched a massive attack on the Anzac's. Around 10,000 Anzac's faced over 40,000 Turkish soldiers. The Turks plan was to use a surprise attack and overwhelm the Anzac's with their huge numbers alone. The Anzac's ,though, defended themselves and their the ground they occupied from the repeated attacks. Around 3,000 Turks died and another 7,000 were wounded. For the Turks, though this was their biggest disaster. Considering it was alarge disaster it was only one of a few disasters that they had during the whole campaign.
As unsucsessful attacks at Helles continued, General Sir Ian Hamilton who was in charge of the Gallipoli campaign, began planning and preparing for an attack at Anzac. His aim was to take the higher positions of the Sari Bair range and drive the Turks from the high slopes. Two columns of men, a left column and a right column, would be needed to advance up the Sari Bair range and capture Chunuk Bair, Hill Q and Hill 971 (Koja Chenen Tepe) during the nights of the 6 and 7 of August, 1915. A diversionary attack by the Australians would distract the Turks from the assault.This was the attack at Lone Pine. Lone Pine was one of the few victories for the Allied forces. Four days of fighting lead to the Australian control of the area. 7,000 Turks and 2,000 Australians died during this battle. The Turks pulled out of the Lone pine area though only to appear on the Sari Bair. At dusk on the 6 of August, 1915, two covering forces set out to secure the foothills through which the columns would move. The Maori Contingent and New Zealand Mounted Rifles units took the key point and made sure the path was clear. Then the plan fell apart when the left attacking column got lost in the dark whilst trying to navigate the rugged terrain. And the right attacking column never actually formed. Its two parts were to meet on the Rhododendron spur, which was approximately 500 metres below the summit, before making the rest of the way to the top of Chunuk Bair. At dawn on the 7th of August the New Zealand Infantry brigade ,who was one of the parts of the colum, was still waiting at the spur for the other part to arrive. The attack went ahead without them at mid-morning. The Wellington Battalion were commanded to meet witth the Auckland Battalion who reached 200 metres short of the summitUnder the cover of the early morning darkness on August the 8th, 1915, the Wellington Battalion rushed to the top of the hill to find it  had been abandoned by the Turks. British soldiers and some of the Auckland battalion made it to the summit not long after. Reinforcements (the Otago Battalion and the Wellington Mounted Rifles) could not reach the summit to relieve the tired soldiers until that evening. The New Zealanders held the summit for two days under the heat of the turkish climate and under constant fire from the Turks. But on the 10 of August, 1915, a massive Turkish counter attack pushed the British soldiers, who had relieved the Anzac's the previous night, off the summit. Delays compromised the plan and were a major reason for its failure. Even when The British troops had taken their positions at Chunuk Bair or Hill Q, which was captured for a while by Gurkha soldiers, sufficient reinforcements could not arrive to secure their position. Had positions been held, the Allies could have pushed on towards the Narrows to destroy the remaing forts and let the naval attack proceed.

Conditions at Gallipoli

Terrain:
Steep valleys, deep ravines and high cliffs towering above long narrow beaches make up most of what the terrain consists of.

Weather:
The weather was extremely varied. Searing hot summers were and are common as well as bitterly cold winters. Rain was another big problem, when a storm hit the Gallpoli Peninsula, the rain was so bad that the trenches filled with water. Men drowned and possessions were washed away.

Food and Water:
Food was plentiful though unvaried.It consisted of tinned meat, jam, tea, and biscuits so hard it was like biting into a rock. Fruit and vegetables were in short supply. Water was scarce for a lot of the time. Troops dug wells and grabbed water bottles off dead bodies. Ships brought in most of the water and loaded it into large tank on the shore.

Disease:
Disease, especially dysentry flourished among men already weakened from weeks of inadequate food. Bill East said in Voices of Gallipoli by Maurice Shadbolt, 1988:
I was running all the time. We couldn't enjoy our food. We were down to skin and bones. Dysentry just ate away at our intestines.
The Psychological effects on soldiers were enormous. With no place safe from artillery fire troops would be very paranoid. Vic Nicholson said in Voices of Gallipoli, by Maurice Shadbolt, 1988:
I remember moving downhill in the dark. There was a bloke screaming somewhere, screaming terribly. He could have been a New Zealander. He could have been a Turk... Scared? Sometimes you were too scared to be scared.
Another source of disease was the flies. Fred Waite said in The New Zealanders at Gallipoli:
Countless hordes of flies settled on everything edible. The soldiers waved them off. The black cloud rose and descended among the filth on the other side of the parapet. Presently they were back again on the food,-and so on, from the jam to the corpse, and back again to the jam, fitted the insect swarm, ensuring that the germ of most things undesirable were conveyed to the soldier's system through his mouth.


What were the outcomes of the Gallipoli campaign?

The Failure of the August Offensive created doubts in London about the Gallipoli Campaign and evacuation was considered. Appalling weather conditions ,however, sealed the issue. A storm swept over the peninsular in late November that resulted in rain flooding trenches, in which men drowned, and drenched everything. The following snow and cold winds left many dead from exposure. Survivors from both sides were cold, miserable and barely able to fight. In London, the government reluctantly agreed to withdraw from Gallipoli. The evacuation went without any problems what so ever. The Anzacs left Sulva and Anzac on 19 and 20 of December and Helles was evacuated of its last British troops on the nights of 8 and 9 of January, 1916.  


This picture shows the miserable conditions the troops had to go through (This image was found at http://www.awm.gov.au/visit/images/PAIU1989_140_01_1.jpg)
 The campaign was a costly failure for the Allies who suffered 44,000 British and French deaths, as many as 8,700 Australian deaths and New Zealand suffered  2,721 deaths. The wounded though numbered in the hundreds of thousands with up to 100,000 British Allies, including 20,000 Australians and nearly 5,000 New Zealanders. It was also costly for the Turks who sustained 87,000 deaths in the campaign along with  as many as 160,000 Turks wounded.
 It was obvious now that the British Forces seriously underestimated the Turkish defenders and their leaders. For the Turks, it was the beginning of national revival. Mustafa Kemal Atatürk, who was dubbed the 'Hero of Gallipoli' would soon be named the first president of the Turkish Republic.
After funding the war, Britain's economy had taken a turn for the worse. Britain who had been one of the worlds largest investors had now become one of the worlds most indebted nations. Inflation had more than doubled between 1914 and its peak in 1920. The value of the British Pound had dropped by 61.2%.
 The Campaign, though comparably a small part in the First world war, sparked a change on both sides, from the revival of turkey to Britains embarrassing evacuation.

Of what significance does the Gallipoli campaign have to New Zealanders?

Why did we go in the first place?

The Gallipoli Campaign had a significant effect on New Zealanders. New Zealand first joined the war because of the British involvement in the war and that we wanted to show our loyalty to the British Empire because at this stage of New Zealands development, New Zealand was highly dependant on Britain. Because of the British Empires size and wealth, keeping an alliance with them was essential and helping the British in their efforts in the war would keep the bond between the two countries strong so that the British would continue to protect New Zealand.

Economic Position

For most countries, economic challenges would have been a problem if entering the war, fortunately New Zealand was in a good economic position and was able to enter. This was because of the British buying New Zealands exports in bulk to supply their needs to go to war. Exports like Meat and dairy products, were needed for the meals for the soldiers and wool was needed to make the uniforms the soldiers would wear. During the war the war would have still meant exports would be shipped out to the war zones, creating revenue for those still in New Zealand.

Anzac Day

Anzac Day is a day celebrated in New Zealand and Australia that celebrates the returned servicemen and remembers those who gave there lives for the Gallipoli campaign and other campaigns that New Zealand has been involved in. The day is celebrated on the 25 of April. The commemoration starts at dawn to coincide with the Anzac Cove landings.


This Photo shows the number of people who feel strongly about the Anzac's and Anzac Day (this Photo was found at http://www.odt.co.nz/files/story/2009/04/a_large_crowd_gathers_at_the_anzac_dawn_parade_at__1740869406.jpeg)
 
A Nations Identity 

New Zealand and Australia both found a sense of national identity. Some say that the two countries were"baptised in blood" because of the timing that our two countries found that sense of nationality and because of our number of losses our countries sustained. Previously, Pakeha were considered colonists, but after the campaign Pakeha and Maori were now known as New Zealanders.

Returning to Normal

Unlike many European countries, New Zealand quickly returned to its normal course of action after the war. This said, the number of deaths did have an impact on our country. The impact on the work force was a large one. With many of the fit and healthy men overseas, fighting, during the war there would have been less  people working meaning less gets done/made which ultimately would have meant that less money was being made. Then, after the war, the number of men who did not return would have left a large gap in the work force, as well as the impact on family life. For children who's fathers and wives husbands who went to war the reality of  moving on without a Father or husband would be tough.